Are you tired of the splits, cracks, potholes, and broken sections of pavement on your driveway? The tri-county area of Rochester, New York sees harsh winters that seriously damage asphalt driveways. Once the rainwater of autumn sinks into the cracks of your driveway, the frigid temperatures of winter come and freeze that rainwater. The ice swells and breaks open the bond of asphalt, which creates those deep crevices every year.
Enough Already! It’s time for Residential Driveway Sealing
But enough is enough. It’s time to get your driveway newly paved. We’ll explain the process with you so that you can know what to expect once the paving process begins.
1. Analyze your Driveway
Residential Driveway Sealing
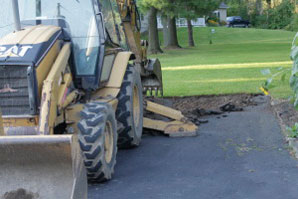
We’ll first take a look at your driveway and see if we can resurface areas instead of completely replace it. If you do need replacement, we remove the driveway that’s already there. We’ll use a backhoe to scrape away the old pavement to make way for the new. If you still live in the gravel driveway days, we’ll collect all loose stones to make the foundation smooth. Our twin drum roller firmly compacts the soil.
If it’s a complete dig out project, we install drain ditches to direct rainwater. We run water over the work area to see where it flows and then fill those places with soil to prevent heaving or collapsing. The levelling process is called grading.
2. Lay the Base
We lay 8″ of stony, jagged rocks. Sand requires fewer inches of base than clay. This layer of rocks should be left alone for a full week in order for it to settle. Rain actually helps it settle in.
3. Seal the Driveway
We install the binder over the stone. Once that’s compacted with the 2,000-10,000 lb. roller, we seal the edges and inspect the final product.
Each paving job differs from one another. But our promise for durable residential driveway sealing remains the same.